Thursday, June 27, 2013

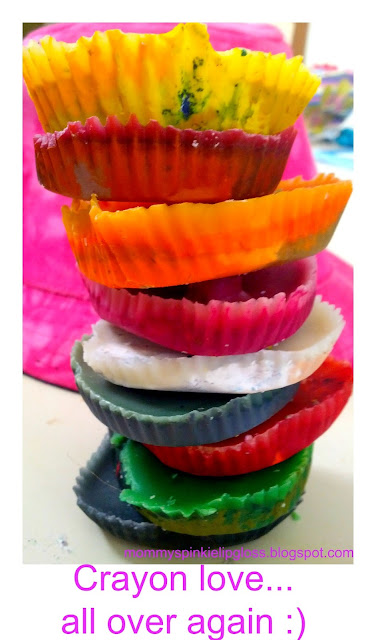
Crayon love again!...


Put some broken crayons in little cupcake things & a cake pan, put that in a ziplock baggie, and let the sun do the work... easy peasy!! 

Nyla & I thought this looked like a flower, she wanted to put this in her room

We added a little sticker with the start time & temperature,  then another with ending time. (about 1hr 20min/84 degrees)

I forgot, well...actually we were all out of aluminum foil, (can you believe that what kind of household is that?) but anyway throw some foil on the bottom of your pan. My cupcake things leaked now I have to deal with that...yuk!

We've re-enjoyed crayons before but always in the oven; I got this great sun-soaked idea from MamaSmiles, she has a year long blog carnival where you can find & link great ideas by the season.  How cool is she!!!


sunnydaytodaymama


HAVE FUN TODAY!!
post signature

Monday, June 24, 2013

Jumpin on the bed...


One morning I was coming out of my room and I caught Nyla having fun, WOW what a special moment for me.  I don't usually walk around my house with my phone but boy I'm glad I did this day because this moment was gone in an instant!

http://picasion.com/i/1UJrA/
A Special Nyla Moment...


Here's another MOMENT that I had my phone & it changed my outlook. (Seriously, I really don't have my phone attached to my hip :)

Hey, I want to give a super shout out to Manon's blog.  She has a really fantastic tutorial on creating animation & she's a really fun artist!  If it wasn't for Manon I wouldn't be able to share my captured Nyla moment and I can't wait to have some silly fun creating animation!! So big heartfelt thank you!!

I hope everyone has a jump on the bed, special giggly day!


post signature

Saturday, June 22, 2013

Crayons + Beach Shells = Perfect keepsake!


We gathered these clam shells from Nyla's school field trip awhile back.  I remembered making shell candles back when I was a little girl so I thought it would be fun to do with Nyla.


As always, Nyla added her fun, creative twist to my ordinary plain.  YAY, I just love her!

WHAT YOU NEED:
crayons with wrappers removed & broken up
wax (we used soy)
wicks
shells

HOW TO:
Just melt your wax according to directions
(we melted ours in the microwave w/safe containers)
Add melted crayons (we used Nyla's favorite colors, blue, pink & green)
Add your wick (this is the trickiest part trying to get your wick to stay up) 
Add anything fun to melted wax, Nyla chose to add crayons, crayon shavings & some of the wax that spilt out of shells when it dried she broke off & added to wax)   

 (Nyla gave some to her teacher as part of a thank you gift & now I've got plenty of candles for hurricane season!)  

post signature

For other seaside, beachy crafts check out this link party Zing Zing Tree

Tuesday, June 18, 2013

FAMOUS PAINTING UPDO...


I've mentioned my famous painting here but its been awhile.  
I thought it was time we came to town, hehe check it out!


Just swing by your nearest thrift store, get some pictures from mags or your scrapbook and have fun!

Nyla loves moving the pictures around and adding more fun to it. 
This just makes me giggle, I hope you too! 


post signature

Thursday, June 13, 2013

GNOCCI TUNA SALAD...


This is about the quickest, easiest 6 ingredient meal EVER! Plus, its super yummy & filling.

Here's what you need:
Gnocchi
Can of tuna in olive oil
Spinach
Tomato
Cheese
Croutons

Here's how:
While gnocchi is boiling (about 3 min.), tear some fresh spinach, get out a can of solid chunk tuna in olive oil, cut a tomato, grab 2 little cheese triangles.

After gnocchi is cooked put in a large bowl, throw in the spinach (it will cook from the steam), tuna, tomatoes, gently stir together then mix in your cheese.
At the end throw in your croutons and this is what makes it a salad :) 

I made my croutons from scratch & after making these yummy things, I'm never going back, finally no more throwing all that bread away! 

Oh, if there is any left over, this taste yummy cold the next day, but if your going to eat it this way just skip throwing them into the big bowl the night before & save for individual taste.


I'm having fun here, come join the party!
One Artsy Mama

post signature

Wednesday, June 12, 2013

Stress Buster Kit!!


Is this about the Fabbest thing ever!  It immediately conjures up total fun memories of jumpin, twisting, anything to pop those bubbles...a perfect stress buster!

EASY HOW TO'S:
bubble wrap
ziplock baggies
fun scratch paper
little labels

Just fill & staple label, I made ours with one side of label saying stress relief packet & other side says open for fun.

I got this super perfect idea from this sweet daughterAww...  Thank you so much for this amazing idea, you ROCK!


post signature
I'm hanging here, come join me!!

It's Overflowing

Monday, June 10, 2013

FATHER'S DAY GIFT...shadow art!


I got this really cute & fun idea from this Superstar blogSometimes homemade.

It was fun, quick & easy! For a one of a kind art project, you have to give this a try! We had to do this super quick before the sun slipped away & Daddy got home.  Our sidewalk was a little bumpy so I told Nyla to jump up on the truck.  
Boy, she got a big kick out of that!

The wind was blowing our sign around & the sun was fading & I was trying to make sure Nyla didn't fall off the truck as I was danglin on one foot but I think the pics turned out great :)

I took a couple of the pictures & got architecture size black & whites made (super jumbo cheap pics 2 for around $5)


I can't wait to do more shadow art... when the sun comes back!  Thanks Sometimes Homemade for sharing this super cute Father's Day idea, you made my day!, whew, I can kick back & relax - usually I'm super last minute on the gifty ideas!


Come hang with us, were having a ton of fun!


post signature

Friday, June 7, 2013

Pill box to Candy Stash!

Ok, I never ever ever thought I would own one of these things!
But, I've had crazy allergy, coughy junk going on these days & I hate seeing all those medicine bottles all over my counter top.  The thing is if I tuck them away in my cabinet then I forget all about them.  So, I've been thinking there has got to be away to glam this up! 

So, another trip to the dollar store & I picked up a jumbo sized pill box.


Now, that I'm done with my medicine I've got a place for my candy stash and my counter looks way funner!


Uh huh, quickest DIY ever! I just grabbed some duck tape & some glitter tape, scissors and I was done in about 5  all while chillin in the sun.


Poofy Cheeks post signature

Wednesday, June 5, 2013

Gifty for Teacher!...


I just have to say...MAGIC WALLETS ARE THE COOLEST!

I made one for Nyla while she was sleeping and I left one for her to decorate, so she did before school.  She thought it would be the perfect gift for her awesome teacher, Mr. Kossove. (maybe he can shed some light how this magic trick works :)


I just love, love love how Nyla decorated it and filled it with a little heart! awwww.  

Just zoom over to Minieco.co.uk for the full tutorial and tons of inspiration!

Ok, I just have to confess my total fumbly side, I couldn't get it at first :( so just in case open left to right, right to left, left to right, right to left - or the other way around.  I get it now & I wanna make one for me!

I hope you have a super fun-filled day loaded with magical experiences!

I'm hanging here, come join me!

post signature

Monday, June 3, 2013

FLIRTY SKIRT CHANDELIER! ...


Every time I look at my chandelier, I think I've really gotta get a new one...if any of you have a house from the 90's you'll know exactly what I mean!  It's just I can't decide what I want; and since my husband is a commercial fisherman, he's away a lot and when he gets home the last thing he wants to do is install one!  

So, one day I was in the dollar store and found these post it like notes and these little stick on circles. And that is how my chandelier evolved! 


I love it!  It's like it's wearing a little blue flirty skirt.  Now, I can look at my chandelier and smile instead of grumble as I walk by.  It only took about a 30 minutes (I took breaks:) 
and about $3.00.  Yes, this is probably a temporary fix but the real joy is I traded my chandelier irritation for a chandelier smile.   Now, I don't have to be frustrated every time I walk by my chandelier which is like a million times a day!   Plus, I have plenty of stickies for my next brainstorm!  

Whew, I got super lucky! Post its were the exact same size as the panels! Measuring & exactness are not my thing!

I don't think anyone needs this but
Here's how I did it:
I started at the bottom of each panel stuck a stickie & worked my way up.  Did a couple more panels, took a couple of breaks then moved on to the next panel until I was done. No exactness, just kept on stickin.

The top of the panels were curved so I had to make a template, just a little measuring and then cut 10 at once to complete all the panels.

Then added the circle stickers to cover the little metal things.  

Now for the chain, I just added some left over wall paper and some blue ribbon from my craft stash. (again no measuring)

For the circle I covered it with more stickies & dots.
  
Super Easy Peasy!!

I hope you have an amazing day and hey, don't wait 2 years to end an irritation that only takes about 30 minutes even if its only temporary! 
(some of my sticky notes fell off but since I had extras I just stuck new ones on) Here's where I made a quick Change in 5 minutes & Mailbox WOW! to increase my daily happiness.

hmm... I think I'm gonna look for a blue ruffly skirt, I've been seeing them all day :)

I'm having fun here, come join me!

Today's Creative Blog
Poofy Cheeks

If It's Not Baroque


The 36th Avenue

post signature